Agusta-Bell 206B RC Helicopter in Scale 1:5.7 of the Greek Army Aviation


Introduction

I have started this blog as an english-text alternative to a thread that I have opened in modelclub.gr (modelclub forum in greek) regarding my project to build an RC scale model of an Agusta-Bell 206B Jet Ranger II of the Hellenic Army (see unofficial site).


Now a few words about the project itself. The model is based on the fuselage provided by Vario (model 1004) in scale 1:5.7. There are very little differences between a Jet Ranger III (model kit) and an Agusta-Bell AB-206B Jet Ranger II that I needed for the project, so I decided to get the kit from Vario. The kit has been bought from one of the best specialists and professionals in the field, Mr Thomas Baumann who has helped me with making my choice of the model and its accessories (Helikopter Baumann). Thanks Thomas! I would also like to thank the team of eflight for their professional support not only for this construction but for all my RC models and accessories. In addition, I would like to thank the team from Innoflyer and especially Mr. Christophe Raible for the help with the lighting system and for letting me test a new CPL model before its official launch. I would like to add here the biwix.com RC helicopter store and Johnny Trolliet at my hometown Renens for his exceptional service, availability and prices!

The particularity of this project is that the mechanism that I fit in the fuselage is not the one from Vario but a modified Align T-Rex 700E (Align RC Helicopters). I will give here details on the way that this is done with diagrams, photos, tips and tricks. This will cover the first part. The flight tests of the modified T-REX 700E have been conducted at the RC model field in Dizy, Switzerland that belongs to the Dizy RC Modelling Group (GAM Dizy). Big THANKS to all the members of the Club for the great friendliness since the first day I started there and for their help with advice and tips!

The second part will be dedicated to the scale model itself. Some photos of the Greek AB-206B can be found on the internet but they do not cover all the details. More photos of the aircraft with the Greek colors may be requested in the forum of modelclub.gr where I have gotten most of them thanks to the team spirit and great friendliness of the members (THANKS^1000 dsamba!!!). In order to complete the photographic part of the project I managed to get my own photos of a Jet Ranger III. This has been made possible thanks to the courtesy of the people from Heli-Lausanne (Heli-Lausanne) who have immediately accepted my request to get there and take as many photos as I needed. A big THANKS to them too!!!
At the last phase of construction, I have got invaluable help for the dimensions of the AB-206B landing gear from Iraklis Karailidis. Many-many thanks to you Iraklis!

So after this short introduction I will start publishing the steps I have already taken and will take during this quite challenging project (at least for me, it is my first scale RC helicopter).

I hope that you will find this blog helpful if you have a similar (or the same) project as mine and you will enjoy it as much as I do!

Welcome!
Hellenicopter

19/10/2014

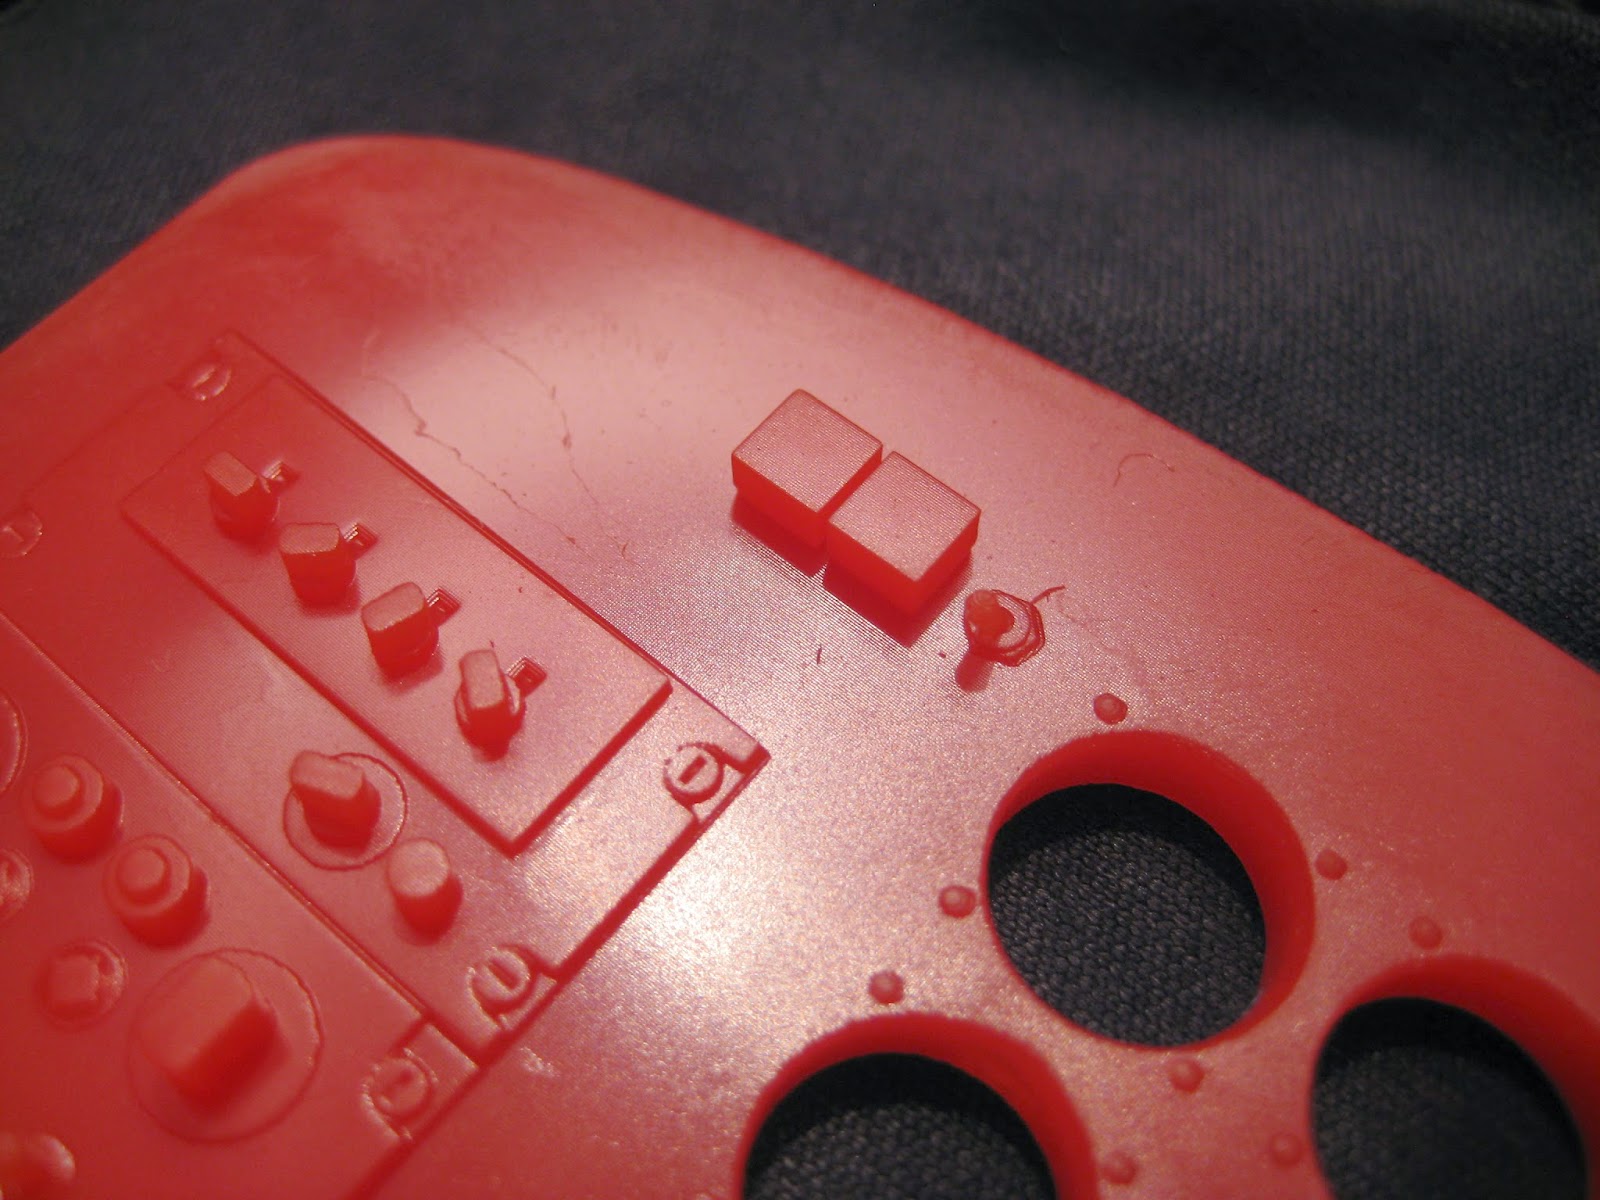
Update on the 3D printing of the heli's instrument panel. This time I have used the Makerjuice SubG+ resin and the result is nice. All switches have been printed nicely. This part is the most demanding in terms of definition and I had to very carefully adjust the focal point of the DLP projector. It paid off!

I am really happy with the mUVe DLP system and soon I will get the upgrade for the mechanics and then the results will be really outstanding. More CAD files are on the works for the exterior parts and combined with the Cubify 3D Scanner they should fit like a glove to the curves of the Jet Ranger.

More to come soon. If you search a dealer for the 3D printer in Europe try CADPrint in Switzerland (where I bought it).


And a reference photo of the cockpit from Jerry Gunner (find on Flickr).
Cheers,
Hellenicopter


15/10/2014

Some new test structures built with my SLA 3D printer. Gradually the process is stabilized and the results get better. Here the target layer thickness has been set to 50 micrometers.

More to come soon...


All CAD files are made from scratch based on photos. This one for the instrument panel is not finished yet and some dimensions need to be corrected.

Cheers,
Hellenicopter

06/10/2014

Finally seeing some progress there...

After a long period waiting for the Cubify Cube 3 I finally cancelled it and went in the stereophotolithography solution (SLA) from mUVe.

I am still a bit experimenting but not far away from the optimized settings. I have started to build some test parts beginning from the pedals of the heli.

Still not 100% to scale but close, you can see the base of the pedals below. All CAD parts are made from scratch using photos like the one below. I don't show you yet the pedals themselves as the "AGUSTA BELL" extrusion on them is written mirrored due to a false setting in the printing setup.


 The part shown here is ~3.5cm long, the top holes ~1.4mm in diameter and the lateral ones ~1.8mm in diameter. The thickness of each layer of resin is 100μm and I will test the 50μm in a few days. The quality of the printout is quite acceptable and there is room for improvement as the setup (both mechanics and optics) are not fully optimized yet (getting there fast).


I hope that now things will move faster for this project.

Cheers,
Hellenicopter